All workloads require to access different services or in one way or another. One of the ways is to provide an application credential which is used to authenticate to different services, for example, retrieving a secret from a Key Vault, accessing an Azure Resource, calling the Graph API and so on.
The problem to using an application credential is that you need to secure its secret otherwise the secret used to getting access to different services or getting secrets might cause you some downtime when it expires or a security problem if it leaks.
One solution to that problem was to use Azure Pod Identity which allowed your pods to authenticate to services and retrieve secrets by using managed identities which was awesome but it couldn't scale well. Another problem of Azure Pod Identity was that it never showed any promise of going GA which kept me and other people from even trying to implement even at a POC scale.
Fast forwarding today, we have a new, more robust feature called AAD Workload Identity which allows you to have a system that uses the native capabilities of Kubernetes without much hassle.
The main differences between Pod Identity and AAD Workload Identity is that it completely removes the transient issues with instantiating identities in pods and works on any type of Kubernetes cluster (no vendor locking) .
How to works
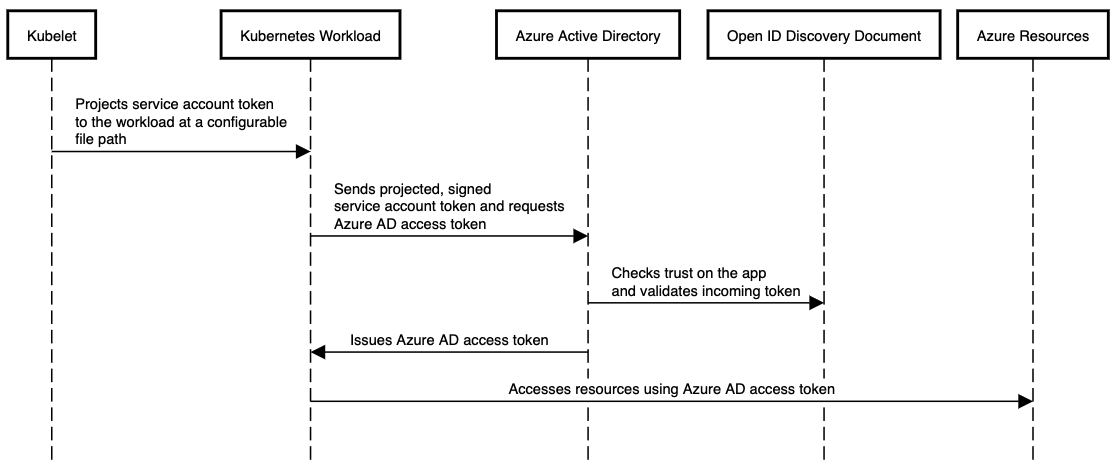
In this model, the Kubernetes cluster becomes a token issuer, issuing tokens to Kubernetes Service Accounts. These service account tokens can be configured to be trusted on Azure AD applications. Workload can exchange a service account token projected to its volume for an Azure AD access token using the Azure Identity SDKs or the Microsoft Authentication Library (MSAL).
The quote from above tells us a little bit about how to system works. The devil is in the details and from there we can denote that the identity is instantiated inside the cluster via a Service Account which can then be passed through a workload and we can do a lot of interesting stuff from there.
Basically the system requires you to create an Azure AD Application which you configure to accept the requests from a Kubernetes cluster.
How to configure / install in AKS
You don't need to recreate existing clusters to start using Workload identity as it can be enabled by a simple update.
To simplify the operation, I created the following script which takes an existing AKS cluster and configures it with workload identity.
export SUBSCRIPTION_NAME="<SubName>"

export K8S_RG="<RG>"
export K8S_NAME="<k8sname"
export APPLICATION_NAME="kube-federated-identity"
export SERVICE_ACCOUNT_NAMESPACE="default"
export SERVICE_ACCOUNT_NAME="workload-identity-sa"
export TENANT_ID="6bf0221e-3787-496e-bb4f-e4c5d19fbe62"

az account set -s "${SUBSCRIPTION_NAME}"

az feature register --name EnableOIDCIssuerPreview --namespace Microsoft.ContainerService
az feature list -o table --query "[?contains(name, 'Microsoft.ContainerService/EnableOIDCIssuerPreview')].{Name:name,State:properties.state}"
az provider register --namespace Microsoft.ContainerService

az extension add --name aks-preview
az extension update --name aks-preview

az ad sp create-for-rbac --name "${APPLICATION_NAME}"
az aks update --name $K8S_NAME --resource-group $K8S_RG --enable-oidc-issuer

export APPLICATION_CLIENT_ID="$(az ad sp list --display-name "${APPLICATION_NAME}" --query '[0].appId' -otsv)"
export APPLICATION_OBJECT_ID="$(az ad app show --id ${APPLICATION_CLIENT_ID} --query objectId -otsv)"

export SERVICE_ACCOUNT_ISSUER=$(az aks show -n $K8S_NAME -g $K8S_RG --query "oidcIssuerProfile.issuerUrl" -otsv)

cat <<EOF > body.json
{
  "name": "kubernetes-federated-credential",
  "issuer": "${SERVICE_ACCOUNT_ISSUER}",
  "subject": "system:serviceaccount:${SERVICE_ACCOUNT_NAMESPACE}:${SERVICE_ACCOUNT_NAME}",
  "description": "Kubernetes service account federated credential",
  "audiences": [
    "api://AzureADTokenExchange"
  ]
}
EOF

az rest --method POST --uri "https://graph.microsoft.com/beta/applications/${APPLICATION_OBJECT_ID}/federatedIdentityCredentials" --body @body.json

helm repo add azure-workload-identity https://azure.github.io/azure-workload-identity/charts
helm repo update
helm install workload-identity-webhook azure-workload-identity/workload-identity-webhook --namespace azure-workload-identity-system --create-namespace --set azureTenantID=$TENANT_ID

cat <<EOF | kubectl apply -f -
apiVersion: v1
kind: ServiceAccount
metadata:
  annotations:
    azure.workload.identity/client-id: ${APPLICATION_CLIENT_ID}
  labels:
    azure.workload.identity/use: "true"
  name: ${SERVICE_ACCOUNT_NAME}
  namespace: ${SERVICE_ACCOUNT_NAMESPACE}
EOF

kubectl annotate sa ${SERVICE_ACCOUNT_NAME} -n ${SERVICE_ACCOUNT_NAMESPACE} azure.workload.identity/tenant-id="${APPLICATION_TENANT_ID}" --overwrite
The script does three main things. It updates the existing cluster to enable the OIDC issuer, it then create the application that will be used for federation and after that create the service account in the cluster and patch it in the application.
The main takeaway from here is that you need to create a service account for each namespace you want it to use that application. This means that you can use multiple applications in one single cluster where you have namespace segregation or a single application per multiple namespaces. This means that you have options when configuring it.
How can I use it?
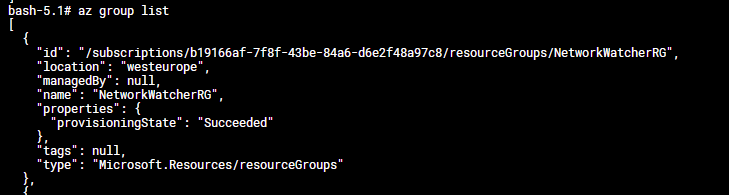
After you created the service account and configured the application, you can now play around with the token.
For example, you can configure a pod to work with the federated token and connect to Azure.
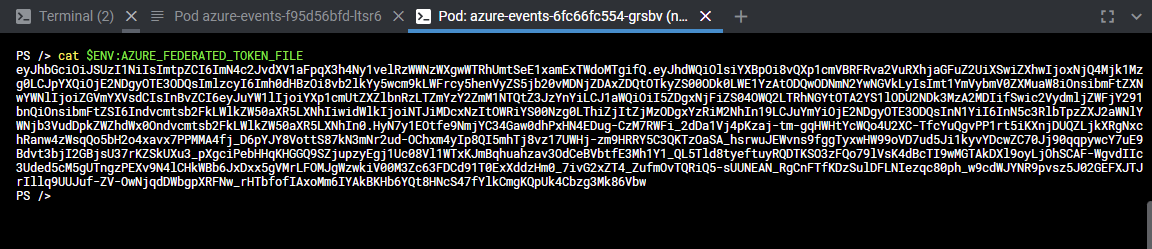
The deployment from above doesn't contain something special to use the federated token but as you can see, I'm using the workload-identity-sa service account which will add four environment variables inside the pod which we can use.
The AZURE_FEDERATED_TOKEN_FILE points to the file that contains the jwt token that we will use to authenticate.
Once we apply the deployment and shell inside the pod, we can do a cat on the environment variable and see what we get:
Token
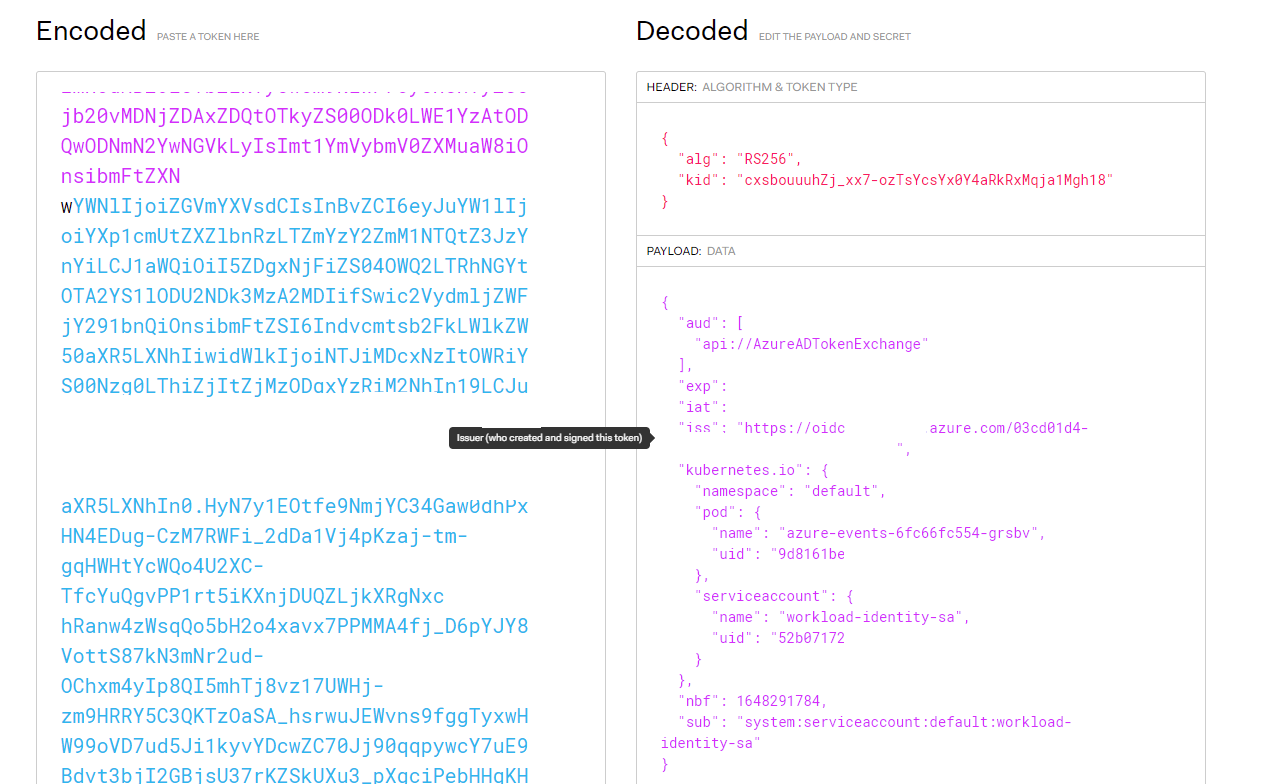
If we want more information about the token, we can paste it inside jwt.io to decode it and see what we receive.
jwt.io decoded token
The token contains the issuer URL and we also have a sub field which contains the service account namespace and name which can indicate to us that only from the default namespace we can send the jwt token to the AAD application.
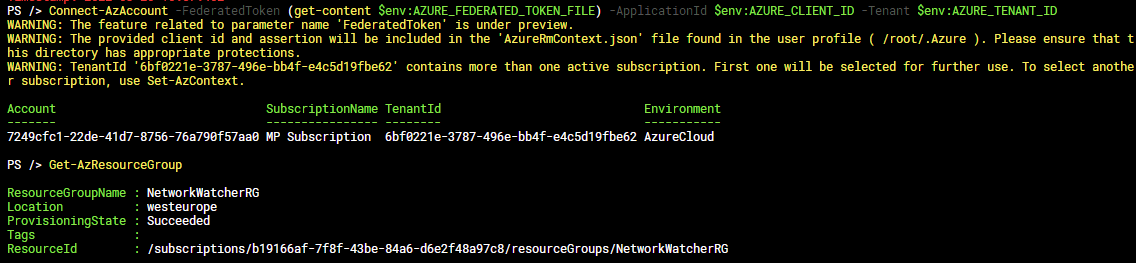
To consume that token, we can run the Connect-AzAccount command with the -FederatedToken parameter:
Same as before, nothing special in the deployment yaml file but we're using the service account.
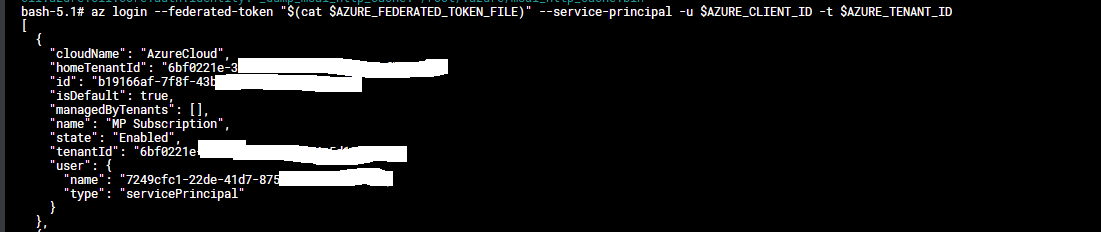
After that we shell inside the pod and run the az login command with the --federated-token parameter
az login --federated-token "$(cat $AZURE_FEDERATED_TOKEN_FILE)" --service-principal -u $AZURE_CLIENT_ID -t $AZURE_TENANT_ID
This is just a small example of how we can leverage the federated identity. If we want to go more developer focused then we can use the examples from the documentation -> Language-Specific Examples - Azure AD Workload Identity
The main aspect of this system is that it's quite easy to configure, it's versatile and opens a lot of doors. This solution is nowhere near the Azure Pod Identity systems complexity and management. It's simpler to manage and once we get managed identities then we can even ignore the application configuration part.
The key takeaway is that no secrets changed hands, we don't need to manage credentials and we just focus on building our solution. In the end, the service principal will get access to Azure resources, Key Vaults or the Graph API and we don't need to rotate secrets to keep the application alive or secure.
Node image retirement is not an emergency if you treat it as a predictable operating model. How to migrate images without chaos, what to test, and how to govern the decision.
APIM isn't just a gateway. It's a governance layer that enforces consistency across AKS, Container Apps, and other platforms. When to use it and when to keep things simple.
Network policy is not theoretical; Cilium and eBPF make it practical. Learn when segmentation actually matters, how to observe before you enforce, and why most teams get it wrong at first.


